- What automated trading systems actually do
- Which platforms and languages to start with
- How to write and test a simple bot
- What risks to expect and how to manage them
Automated Trading Systems: Build Your First Trading Bot

5 min to read
Updated on 06 Aug 2025
In the modern trading world, speed, consistency, and emotionless execution are key. That’s exactly why automated trading systems have become a cornerstone of serious market strategies. Whether you’re managing a portfolio or just placing your first trade, automating parts of your process can save time, reduce risk, and scale results.
Unlike manual trading, which depends on your availability and emotional state, trading automation follows predefined logic — no hesitation, no second-guessing. And the good news? You don’t need to be a programmer to build something useful.This guide will walk you through the basics of trading bot development, from choosing your strategy to writing code, backtesting, and deploying your first bot. We’ll cover:
If you’ve ever thought “I wish the market traded itself” — you’re in the right place. Let’s get started with building your first algorithmic trading system.
⚙️ How Automated Trading Systems Work
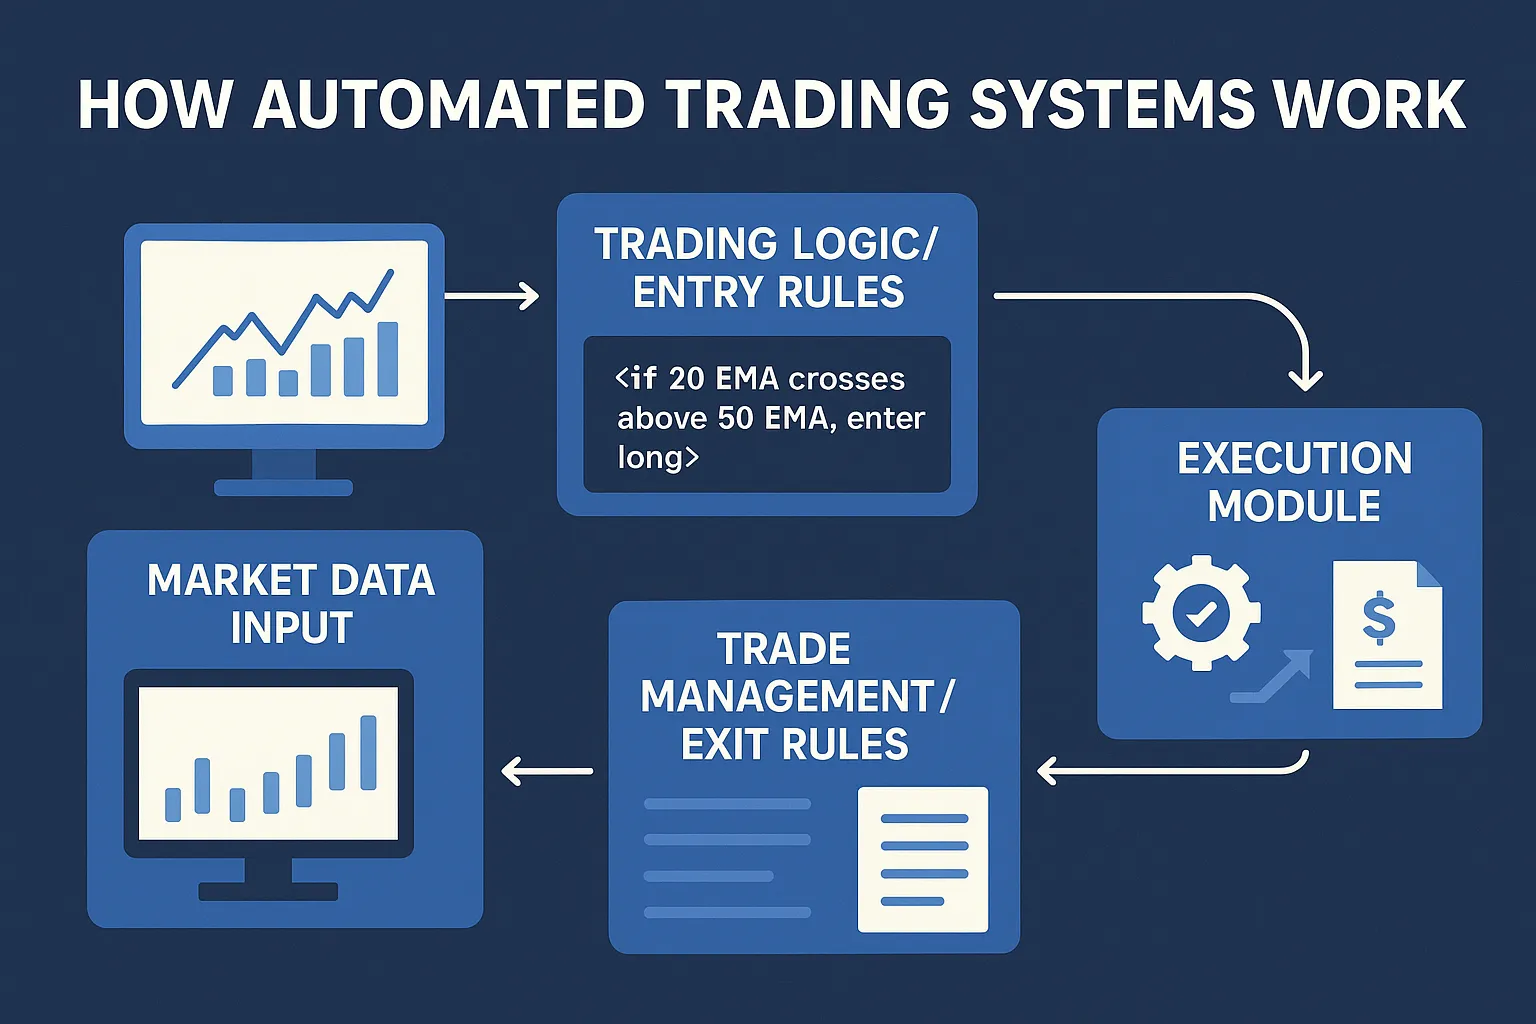
Automated trading systems, or trading bots, follow a clear cycle: get data, decide, execute, and manage. Here’s how the process works in practice — and why automation helps streamline it:
- Market Data Input
The bot gathers live or historical data (prices, volume, indicators), often via an API or broker feed. - Trading Logic / Entry Rules
Conditions are defined (e.g., “if 20 EMA crosses above 50 EMA, enter long”) — this is where strategy meets code in bot development. - Execution Module
When entry criteria are met, the bot places orders automatically—no manual intervention required. - Trade Management / Exit Rules
Stops, profit targets, or time limits are also managed by the bot, ensuring consistency and objectivity. - Logging and Monitoring
Every trade and decision is logged with timestamps. You can review performance, debug, and optimize — key steps in mature algorithmic trading.
Automation removes emotion and delays from trading. You get fast execution, precise risk control, and the ability to run your strategy 24/7 — even across multiple markets.
🛠 Tools & Platforms
Choosing the right tools is crucial for trading bot development and trading automation. Here’s a snapshot of popular environments and technologies:
| Platform / Library | Language | Use Case |
|---|---|---|
| Python + ccxt / Alpaca API | Python | Flexible scripting for stocks, crypto, FX |
| MetaTrader (MT4 / MT5) | MQL4 / MQL5 | Forex bots, widespread broker support |
| TradingView Pine Script | Pine Script | Strategy backtesting and alerts on TradingView |
| QuantConnect / lean engine | C#, Python | Institutional-grade (Equities, Futures, Forex) |
Setup highlights:
- With Python tools, install packages via
pip install ccxt pandas. - For MT5 bots, launch MetaEditor inside MetaTrader and compile your
.mq5script. - In TradingView, create a strategy script, run it in the “Strategy Tester,” and link alerts for automation.
Pro tip:
Use cloud services (VPS or AWS) to run bots 24/7 without interruption. Reliable uptime helps maintain automated strategies.
🧩 Step-by-Step Bot Development
Here’s a clear, beginner-friendly guide to build a basic trading bot using Python and the CCXT library. This bot executes a simple moving average crossover strategy on a crypto exchange.
1. Define Your Strategy
Use two exponential moving averages (EMA):
- Fast EMA (e.g., 9 periods)
- Slow EMA (e.g., 21 periods)
Entry logic:
- Buy: fast EMA crosses above slow EMA
- Sell: fast EMA crosses below slow EMA
2. Install and Connect
bash
pip install ccxt pandas
python
import ccxt, pandas as pd
exchange = ccxt.binance({
 'apiKey': 'YOUR_KEY',
 'secret': 'YOUR_SECRET',
})
3. Fetch and Prepare Data
python
bars = exchange.fetch_ohlcv('BTC/USDT', timeframe='1h', limit=100)
df = pd.DataFrame(bars, columns=['timestamp', 'open', 'high', 'low', 'close', 'volume'])
df['ema9'] = df['close'].ewm(span=9).mean()
df['ema21'] = df['close'].ewm(span=21).mean()
4. Detect Signals
python
last = df.iloc[-1]
prev = df.iloc[-2]
if last['ema9'] > last['ema21'] and prev['ema9'] <= prev['ema21']:
 signal = 'buy'
elif last['ema9'] < last['ema21'] and prev['ema9'] >= prev['ema21']:
 signal = 'sell'
else:
 signal = None
5. Execute Your Trade
python
symbol = 'BTC/USDT' amount = 0.001 if signal == 'buy': exchange.create_market_buy_order(symbol, amount) elif signal == 'sell': exchange.create_market_sell_order(symbol, amount) 6. Log What You Did
python
print(f"{signal.upper()} order placed at {last['close']}")
7. Expand and Run
- Add error handling and retry logic
- Introduce stop-loss and take-profit
- Schedule the bot (cron job) or run on VPS
By the end of these steps, you’ll have built your first working automated trading system — proof that trading bot development is within your reach.
⚠️ Risk Management & Practical Tips for Bot Deployment
Even the smartest bot needs smart risk management. Automated systems can execute flawlessly — but if your risk parameters are flawed, losses will still pile up.
📉 Risk Rules Every Bot Must Follow
To protect your capital, your bot should have these built-in:
- Maximum loss per trade — e.g., 1–2% of your account
- Daily drawdown limit — pause trading if daily loss exceeds a threshold
- Maximum number of trades per day — avoid overtrading
- Stop-loss and take-profit logic — built-in exit rules per position
A good bot doesn’t just look for opportunities — it also knows when to stop.
🛡 Risk Management in Code
Here’s an example of adding a simple stop-loss/take-profit system in Python:
python
stop_loss_pct = 0.01 # 1%
take_profit_pct = 0.02 # 2%
if position_open:
 pnl = (current_price - entry_price) / entry_price
 if pnl <= -stop_loss_pct or pnl >= take_profit_pct:
 execute_exit()
This small piece of code can save your account.
🧠 Practical Tips Before You Go Live
- Start with small capital or demo until consistent
- Monitor bot behavior regularly, even if it’s “automated”
- Keep logs — every trade should be traceable
- Update strategies as market conditions evolve
Sources
- Investopedia: https://www.investopedia.com/terms/a/automated-trading-system.asp
- QuantInsti: https://blog.quantinsti.com/algo-trading-strategy/
- MetaTrader 5: https://www.metatrader5.com/en/automated-trading
- Binance API Docs: https://binance-docs.github.io/apidocs/spot/en/
- FXStreet Strategy Section: https://www.fxstreet.com/education/strategies
FAQ
Can I build a trading bot without coding experience?
Yes. Platforms like MetaTrader (using EAs) or trading automation tools like TradeSanta and Kryll offer visual interfaces. However, for full customization, basic Python or JavaScript helps greatly.
What’s the best market for a beginner’s trading bot?
Forex and crypto are most bot-friendly due to high liquidity and continuous sessions. Start with one market before expanding.
How much capital do I need to run an automated strategy?
You can start with as little as $100–$500 on demo or micro accounts. Focus on performance, not size.
Is bot trading allowed on all brokers?
No. Some platforms restrict automation. Always check your broker’s terms or choose a bot-compatible provider like MetaTrader, cTrader, or Pocket Option’s quick strategies.
CONCLUSION
Automated trading systems are no longer just for technology wizards or hedge funds. With the right tools and structure, anyone can build a simple trading bot to improve discipline, remove emotions, and streamline execution. The key is not perfection -- but constant improvement. Whether you're coding from scratch or using drag-and-drop tools, treat your bot like a business: backtest it, manage its risk, and optimize it over time. Ready to get started? Define your logic, choose a platform, and let automation do the heavy lifting -- with your rules in control.
Start tradingAbout the author :
Trading platforms
Sign up for more like this
Customize your newsfeed with content you're actually interested in — get up-to-date personalized newsletter in your inbox.
Your comment
Comments are pre-moderated to ensure they comply with our blog guidelines.